My Blinky

My TOU
My Templates and word art are for your use in your creations and for tutorial writers to use, I only ask that you direct people to my blog to download, please do not include my creations in your own supplies,I would love to see any tutorials or tags that you do using my work and would love to display it here on my blog so please feel free to email them to me at ymmik29@gmail.com
Time
Friday, May 21, 2021
3:10 PM | Edit Post
FTU Tutorial
This tutorial is my own creation any resemblance to any other tutorial is purely coincidental, for personal use only
you must have a working knowledge of psp
please refer to my tag for placement of elements
remember to sharpen after resizing
I used a drop shadow of
-2,-4,70,10.00
enjoy and have fun
Supplies needed
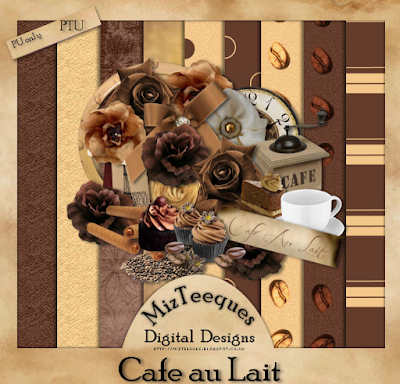
Scrapkit called Cafe Au Lait
designed by Miz Teeques
such a fun kit to play with
from her blog
Tube
I used one called
Girl with coffee
by
Verymany
you can purchase this tube from her store
Mask
I used two different mask
first one is the png version
Vivienne_mask 0060
which you can download from her blog
The second one is my Millie
Millie's Psp Madness
Mpm_mask 24
you can grab this one from her blog
Plug-in
I used xero porcelain
Mura miester copies
eyecandy 5 gradient glow
Font
I used one called
Bitter coffee
Lets begin
Open a new canvas 750x800 fill with white
open Vivienne_0060 and paste as new layer, selections-select all-float-defloat
add a new raster layer, open paper 3, copy and paste into selection-select none
delete the bottom original mask layer
add a new layer above this first mask layer and select all
open paper 11, copy and paste into selection, and select none
apply Mpm_mask 24, merge group and resize 90%
open element 36, resize 60%
place at bottom left of your canvas
and drop shadow
open element 27, resize 45%
place on the lower right side of your canvas
and drop shadow
open element 5
place above the mask layers in between the two elements we just placed
and drop shadow
open element 2, resize 25%
apply mura Miester copies, encirlce first number set to 16 and second number 60
hit ok , move below the big flower just above mask layer
and drop shadow
open element 20
place above the big flower in the middle
and drop shadow
open your tube of choice, resize as needed
place as your top layer, center of canvas
apply xero porcelain, default settings
and drop shadow
open element 25, resize 17%
place as top layer to the right of your tube
and drop shadow
open element 32, resize 15%
place on right side of canvas below the coffee pot
and drop shadow
open element 11, resize 17%
place on right side of canvas behind coffee pot to the left
and drop shadow
open element 41,resize 17% and mirror
place as top layer to the right
and drop shadow
open element 17, resize 17%
place as top layer slightly to the left of the pitcher
and drop shadow
open element 24, resize 20%
place above tube layer to the right
and drop shadow
open element 28, resize 17%
place as top layer to the left of your canvas
and drop shadow
open element 18, resize 15%
place to the right of the cup
and drop shadow
open element 38, resize 15%
place to the right of the cup
and drop shadow
open element 23, resize 15% and mirror
place to the left of the cup
and drop shadow
open element 5, resize 25%
place behind tube layer to the left
and drop shadow
open element 4, resize 15%
place below the other flower to the top of it on left of canvas
and drop shadow
on top flower layer merge down
duplicate the flowers and mirror
open element 52, resize 60%
add a gradient glow 5.00 and color #EBBF8E
place on left side of canvas
and drop shadow
crop and resize your tag
add your artist copyright and your name
save as png
Labels:FTU TUTORIAL
Subscribe to:
Post Comments
(Atom)
Categories
- PTU TUTORIAL (181)
- Wicked Princess (64)
- All Dolled Up (57)
- FTU TUTORIAL (29)
- Tiny Turtle Designs (26)
- Celestial Scraps (13)
- Michal's Designz (11)
- PTU Kits (11)
- Bibi Collection (9)
- Halloween (9)
- Templates (7)
- Snags (6)
- Valentines (6)
- Winter (4)
- Foxy Designz (3)
- Christmas (2)
- Exclusive Tuts (2)
- Patriotic (2)
- word-art (2)
- TUTORIAL RESULTS (1)


0 comments:
Post a Comment